Autotracker

When a video feature of interest has a consistent shape, size, color and orientation in all video frames, it can be tracked automatically using autotracker. This eliminates the need to mark each frame manually with the mouse, thus speeding up the tracking process and producing more consistent data.
Tip: an excellent way to obtain videos suitable for autotracking is to stick colored circular markers on the objects of interest (a white ring around a colored center is even better). Multiple objects can be autotracked if a different color is used for each.
Click the autotracker button  on the toolbar to show or hide autotracker.
1. How autotracker works
Autotracker works by creating one or more template images of a feature of interest and then searching each frame for the best match to that template. The best match is the one with the highest match score, a number that is inversely proportional to the sum of the squares of the RGB differences between the template and match pixels. Once the best match is found, it is compared with nearby match scores to determine an interpolated sub-pixel best match position.
By default, the template evolves to adapt to shape and color changes over time. Higher evolution rates track more rapid changes, but may result in template "drift" over many frames. Template evolution works by compositing the match image with the existing template to form a new template. To limit drift, tethering may be used. Tethering works by compositing the original keyframe image with the existing template after evolving.
A target defines the position at which points are marked relative to the template when matches are found. The target may be offset from the template. The specific track and point marked at the target position must be selected prior to autotracking.
A video frame in which a template and its associated target are defined is called a key frame. Autotracking requires at least one key frame, but additional key frames may be defined to track sudden or extreme changes in the object, background or illumination.
When the best match score is high (a good match), a point is automatically marked at the target position. But when the match score is only moderate (a possible match) then the user is asked to review the match and accept or override it unless autoskip is on. The automark level for automatic marking may be set by the user.
Autoskip continues to evolve the template when possible matches are found even though the matches are not marked. If no possible match is found, autotracker stops and awaits user action.
Autotracker limits its search for a match in each frame to a user-defined rectangular search area. When at least two steps have been marked, the velocity and acceleration of the point mass is used by default to predict the location of future matches and the search area is moved accordingly. However, you can turn off this look ahead feature and/or reposition or resize the search area at any time.
You can also limit the search to the x-axis only for 1D autotracking. Set the axis origin and tilt angle to search along any desired line.
A specialized option is to search all frames non-stop using a fixed area and fixed template. For more information see Other buttons in the Setting and controls section below.
After autotracker has completed the marking process, you may modify the steps at will. In other words, autotracker helps you mark the steps but does not limit your control over them.
2. Preparing to use autotracker
Before using autotracker, scan through the video and verify that the feature of interest is visible and reasonably consistent (shape, size, color and orientation) in all frames. If not, adjust the video clip start frame, end frame and/or step size until this condition is met. Then reset the video to the start frame.
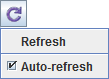
If planning to autotrack a very long video, it is useful to turn off auto-refresh in order to speed up the marking process. To turn off auto-refresh, click the Refresh button on the toolbar and uncheck the Auto-refresh item in the popup menu. When done marking, turn auto-refresh back on or refresh the data manually by choosing the Refresh item in the popup menu.
3. Using autotracker
- Select the target track.
- Shift-control-click the video feature of interest to create a key frame. This will display autotracker if it is not already visible.
- Change the default settings if desired.
- Click the Search button.
Figure 1 shows autotracker after creating a key frame. The template is outlined on the video and shown at 2x magnification in autotracker along with the (perfect) match found. The target point is indicated by a bold cross on the video and the search area is outlined with a dashed line.
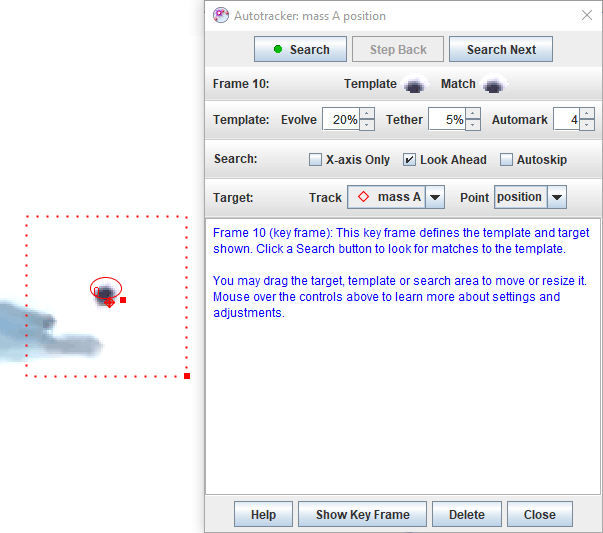
Fig. 1 Autotracker
4. Settings and controls
Controls are organized into the following categories. To learn more about a specific control or setting, simply move the mouse over it.
Search buttons:
- The Search button steps through the video, searching and marking each frame as it goes. Hold down the Shift key for more options as discussed below.
- The Search This button is used to search the current frame only. It is often used to repeat a search after adjusting the search area if a match is not found on the first pass.
- The Search Next button makes a single step forward, searches that frame, and stops. It is useful when you want to review each match before moving on to the next.
Template: The template is the image to be matched.
- Move or resize the template by dragging its center or handle (small solid square), respectively. Tip: the template need not be large nor include the whole object. A feature that is unique and includes high-contrast edges generally works best.
- Set the evolve rate to define how the template adapts to shape and color changes. An evolution rate of 0% does not evolve at all (constant template image) while an evolution rate of 100% completely replaces the template with the match image after each frame. Intermediate evolution rates overlay the match image onto the current template with the indicated opacity. Note: higher evolution rates track more rapid changes, but may result in template "drift" over many frames.
- Set the tether rate to limit template drift. A tether rate of 0% does not tether at all (template image may drift) while a tether rate of 100% completely replaces the template with the keyframe image after each frame and is thus equivalent to 0% evolution. Intermediate tether rates overlay the keyframe image onto the current template with the indicated opacity.
- Set the automark level to define the minimum match score needed for automatic marking. The default level of 4 is recommended as a good starting point. Tip: low automark levels can result in false matches--try increasing the evolution rate or defining additional key frames instead.
Search: The search area defines the region that is searched for the best match.
- Move or resize the search area by dragging its center or handle (small solid square), respectively. Tip: The search area need not be large. For many motions the look-ahead feature does a good job of predicting match positions and searching in the right place.
- Check the X-axis Only checkbox to limit the search to the x-axis only. The coordinate system origin will automatically be set to the center of the template. Tilt the axes to search in the desired direction. Note: if the x-axis does not pass through or near the center of the search area, no matches will be found.
- Check the Look Ahead checkbox to automatically move the search area to predicted match positions using a look-ahead algorithm that assumes constant acceleration. When this option is unchecked, the search area is moved to the previous match position.
- Check the Autoskip checkbox to skip to the next frame and continue searching when a possible match is found but not marked. When autoskip is off, the autotracker will instead stop to wait for user action.
Target: The target defines both the track and point to be marked and the position of the mark relative to the template.
- Select the target track and point from the drop-down lists.
- Move the target by dragging it.
Other buttons:
- The Help button shows this help file.
- The Show Key Frame button enables you to quickly jump to a key frame to review and/or change the template or target.
- The Delete button enables you to easily delete incorrectly marked points.
- The Close button closes autotracker.
- The Options button (Shift-Search button) pops up a menu with the following items:
- Search Fixed Area: searches for matches in all frames using the current (fixed) template and search area. This steps through all frames non-stop no matter what match scores are found. An example of how this can be useful is determining the motion of a moving (translating) camera. If a calibration tape with regularly spaced black dots is included in the background, and a (small) fixed area search is made using a black dot template, then a good match will be found every time a black dot enters the area. The resulting match data can be used to determine the camera speed.
- Copy Match Data: copies match data (frame numbers, non-null match scores and positions) to the clipboard for pasting into a spreadsheet or other document. (Note: match data cannot be displayed in Tracker data tables because they are generated by templates, not by tracks.)
5. Search results
After searching a frame, autotracker will display one of the following search results and, in some cases, present options for solving problems.
- A good match was found (match score above the automark level) and marked automatically (Figure 2).
- A possible match was found. Options include accepting the match, marking the point manually (shift-click), making changes and repeating the search, or moving on to the next frame (Figure 3).
- No match was found. Options include marking the point manually (shift-click), making changes and repeating the search, or moving on to the next frame.
- Unable to search. This can happen if the search area falls outside the video image or, for 1D tracking, the x-axis does not pass through the search area. Options include marking the point manually (shift-click), making changes and repeating the search, or moving on to the next frame.

Fig. 2 Search results: good match
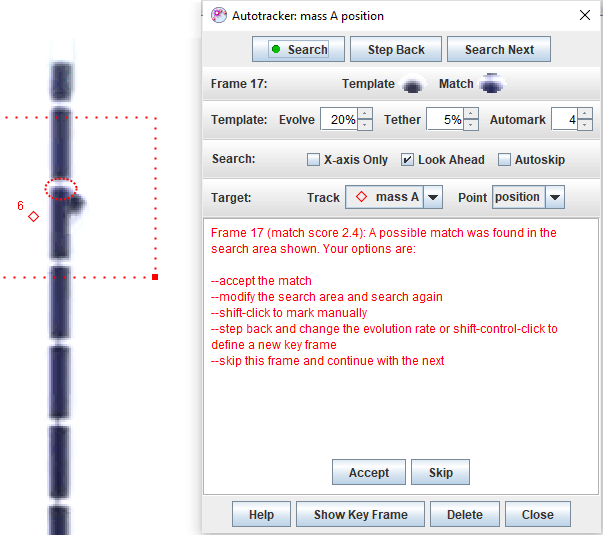
Fig. 3 Search results: possible match (false match in this case)